EDI Viewer - AC2 CPAF Calculation & Copy Function


The AC2 CPAF Calculation is used to edit and enter custom processing volumes for the facility cost center.

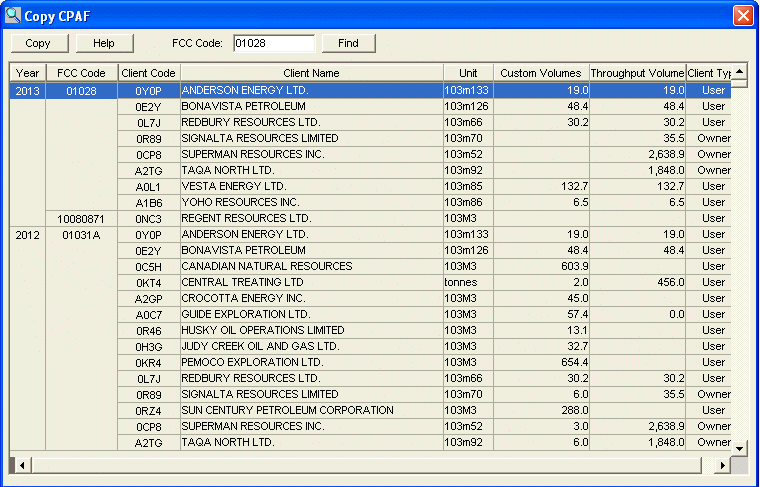
The AC2 CPAF Copy function is used to copy custom volumes.

Part 5 allows you to enter the custom volumes for each user and throughput volume for each owner in the FCC. These volume totals are using to calculate the custom processing adjustment factor, which is then transferred to Part 4 - CCA Allocations.

   
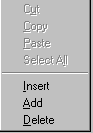
To add or insert a new Custom Volume, you can do any one of the following:
  • Right-click your mouse to get a popup menu and choose add or insert.
  • Press the shortcut keys, CRTL and A (add) or CTRL and I (insert).
  • Click the edit menu at the top of the screen and then choose add or insert.

To delete a Custom Volume, click on the row to delete and do any one of the following:

  • Right-click your mouse to get a popup menu and choose delete.
  • Press the shortcut keys, CRTL and D.
  • Click the edit menu at the top of the screen and then choose delete.

To copy custom volume from an existing FCC, do the following:

  • Click the "Copy CPAF" button and a popup window will appear.
  • FCC codes associated with CPAF for a given production year and client will be displayed. Use the scroll bar to navigate the window and highlight the row you wish to copy by clicking on it.
  • Click the copy button. A message box will appear indicating the function is complete. Click OK to continue.
  • If you wish to copy another custom volume, repeat the steps above and your row(s) selection will be added to the CPAF list. The EDIViewer will not create two exact custom volume records for the AC2.
  • If you need to delete a row(s) follow the description for deleting a Custom Volume above.
  • Click Save on the tool bar to save your changes or tab to a different part of the AC2 and respond to message box by clicking:
    • 'Yes' to save
    • 'No' to exit without saving
    • 'Cancel' to return to the Copy CPAF window

Business Rules:
  • When adding a new custom volume, you can have 2 lines for each client code if the client type is User for one line and Owner for the other line.
  • The client type field allows you to enter throughput volumes for all the owners if you want to track it in the system instead of having them in a spreadsheet. Only the User client type is printed on the AC2 form.
  • When you click on the client name list box, you can type the first letters for the client's name to scroll to that name in the list. For example, to scroll to Anderson Exploration, click the client name list box and then type in AND the system will scroll you to the first AND it finds.
  • You will not be able to delete any custom volumes if you are in read only mode.
 
   
To enter an AC2, click on the tab Part 1-2 - AC2. When you change tabs, your data is saved, so in this case, all data on tab AC2 - Parts 1,2 would be saved if it passed validation.  
To enter AC2 Capital Additions, click on the tab Part 3 - Capital Additions. When you change tabs, your data is saved, so in this case, all data on tab AC2 - Parts 1,2 would be saved if it passed validation.  
To enter AC2 CCA Allocations, click on the tab Part 4 - CCA Allocations. When you change tabs, your data is saved, so in this case, all data on tab AC2 - Parts 1,2 would be saved if it passed validation.  
To Print an AC2 form, click the Print toolbar button or choose Print from the File menu. It does not matter which tab you are on when you print.