
|
EDI Viewer - Saskatchewan Royalty Invoice Import
|
The SK Royalty Invoice Import can import multiple Royalty Tax, Non-Compliance, Provisional Royalty, Compensatory,
Compensatory UWI Change, and Royalty Tax UWI Change files at the same time.
You must now choose a File Type when importing files.
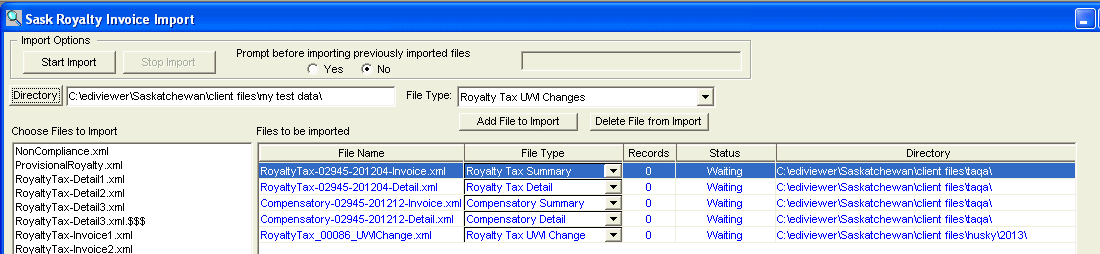
The functions of the import window are:
- Import Options
- Start Import: Run the import if
any files were chosen.
- Stop Import: Stop the import.
The current file being imported will be not be
saved, but any files before this would have been
saved in the database.
- Prompt before importing previously
imported files: By choosing Yes,
the system will prompt you if any Detail files
you are importing have already been imported. If
you chose to continue, the previously imported
data for this invoice will be deleted and the new
file imported. By choosing No,
the system will automatically delete any
previously imported files before importing the
new data.
- To the right of the Prompt before importing
previously imported files buttons, is a Status
area. This will show the the total
number of files being processed and which file is
currently being processed. You can also see which
file is being processed from the Records and
Status columns in the Files to be imported list.
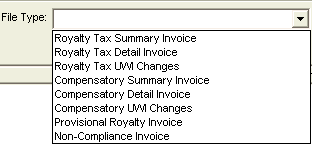
- File Type: You must now choose a file type for the file you want to import. There are now 8 different XML files you can import.
- Add File to Import: Click this button AFTER you have chosen a File Type to add files of this selected type into the Choose files to
Import area into the Files to be
imported area.
- Delete File from Import: Click this button to Delete
files matching the selected File Type from the Files to be
imported area.
- Directory: Change directories to chose
files for importing. When using this function, you must
chose any file in the directory list and then press Open.
If you do not chose a file, the system will not change to
the chosen directory.
The area where the directory name is displayed is also
editable. You can key a directory name into this area and
the system will automatically change to this directory
and display the files in that directory.
- Choose files to Import: This list show
the files available for importing. Click on the file you
want to import and then click the Add button under
Invoice or Detail files to indicate what type of file
this is. You can use Shift/Click or Ctrl/Click to select
mulitple files at the same time.
- Choose File Type: Choose which file type you are importing
by selecting the appropriate radio button and then use Add
to add files selected in the Choose files to
Import area into the Files to be
imported area as your selected file type. Use Delete
to delete all files of the selected file type from the Files to be imported
area.
- Files to be imported: This list shows
which files are going to be imported. All files to be
imported will show up in blue. When the file is being
imported, the color will change to red and the Records
and Status fields will show the number of records
imported and the percent completed. When file has been
imported or was not imported because of an error, the
color will change to black.
To delete a single file from this list,
click the Right mouse button and choose Delete from the
popup menu. To delete all Invoice or Submission files, click
the appropriate Delete button in the Invoice Files or
Submission Files area.